The store will not work correctly when cookies are disabled.
We use cookies to make your experience better.To comply with the new e-Privacy directive, we need to ask for your consent to set the cookies.Our Policy.
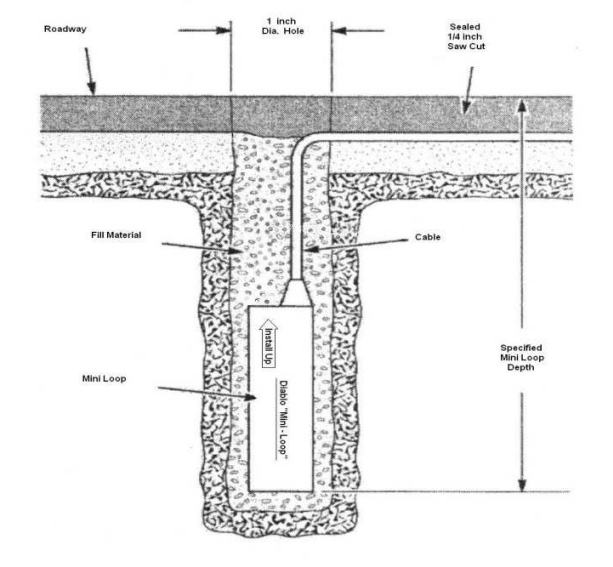
The Diablo “Mini-Loop” is intended to be buried beneath the roadway surface and connected, via lead-in cable, to the Diablo VD909M Detector. Installation costs may be significantly less than those for conventional loops, because only single, straight 1/4-in. saw cuts need to be made and a 1-in. diameter hole drilled about 20 inches deep. Also resulting is the opportunity for greatly increased service life due to the reduced exposure to hazards such as road traffic, pavement movement, pavement deterioration, and roadwork.
The fact that the “Mini-Loop” is not installed in the pavement and that the lead-in is very durable allows the “Mini-Loop” to be used in situations such as cobblestone pavements, poor pavements, dirt/gravel roads, and bridge decks. Minimal intrusion into good pavements is another benefit.
The area of detection provided by a Mini-Loop is smaller than that provided by a 6-ft. X 6-ft. loop and may be considered a point detector. This characteristic allows separation of closely spaced vehicles, very good resistance to detecting vehicles or other moving objects adjacent to the installed location, and total immunity to “crosstalk” problems.
The “Mini-Loop” in combination with the VD909M is ideally suited for detecting the passage of moving vehicles (moving at 1 mph or faster). The “Mini-Loop” is not recommended for detecting slow moving or stationary vehicles.
Installation is straightforward. A 1-in. diameter hole (18-in to 24-in. deep) is drilled for the “Mini Loop”. A shallow, 1/4-in. saw cut from the hole to the edge of the road provides a path for the lead-in wire. The “Mini-Loop” with lead-in is inserted into the hole and the hole is filled with dry sand. Detector Loop Sealant material is then used to fill the slot and top portion of the hole.
It is important that the “Mini-Loop” be installed in a vertical position and that the vertical position of the “Mini-Loop” be maintained. Under some soil conditions, installation can be further simplified by installing the Mini-Loop inside a length of PVC pipe (not steel pipe) with an interior diameter of about 1 inch. In this case, the hole must be slightly larger than the outside diameter of the PVC pipe, typically 1-5/8-in. or less. After insertion of the PVC pipe and Mini-Loop, all cavities are back-filled with fine, dry sand and the installation completed in the normal manner.
With most vehicles, detection will start at approximately the front bumper and end at approximately the rear bumper. Oddly shaped vehicles such as bicycles and trailers may appear shorter to the Mini-Loop than their actual length. For example, some bicycles detect only for a short period of time near the center of the bicycle. Aluminum or fiberglass trailers will likely detect only for a short period of time around the axle and suspension.
These characteristics are very similar to those of a 6-ft. X 6-ft. loop. The primary difference is that the Mini-Loop in itself is only a point rather than a 36 square foot area. This allows detection of closely spaced vehicles. It also places a new limit on maximum vehicle speed to obtain vehicle detection.
1. Hole Boring and Saw Cutting Typically
a 1-in. diameter hole is bored to a depth several inches deeper than final placement to allow for debris in the bottom of the hole. If the soil is such that the hole walls may collapse, it is suggested that a length of PVC pipe (plumbing or electrical) be used to line the hole. This will ensure the Mini-Loop is mounted in a vertical position. It is imperative that the Mini-Loop unit be mounted in a vertical position and that its position is stable. When a liner is used, the bored hole must then be somewhat larger than the pipe outside diameter. Measure the pipe. Plumbing pipe is different from electrical pipe. Plumbing PVC pipe will probably be 1-1/16-in. diameter and electrical PVC pipe will probably be 1-5/32-in. diameter.
After boring the hole (and inserting PVC tube, if used), measure the hole depth to ensure sufficient depth for the Mini-Loop unit to be installed.
A 1/4-in. wide saw cut is then made from the road edge to the hole in the normal manner as for loops. The cut can be shallower than for loop leads, because the cable is only .19-in. diameter. If more convenient, saw cuts may be made before drilling hole for the Mini-Loop units.
Typical Mini-Loop Buried Installation
2. Mini-Loop and Cable Placement
Before inserting the Mini-Loop unit into its hole, it is suggested that a ring of colored electrical tape be placed on the cable, so that the top of the tape will line up with the bottom of the saw cut when the bottom of the Mini-Loop unit is at the correct depth. Insert the Mini-Loop unit and lead-in cable.
3. Resistance Checks
As a last check before beginning permanent installation, resistance checks should be made. All Mini-Loop units are fully checked at the factory. However, it is possible a unit could have been inadvertently damaged during installation. Such damage will usually be uncovered by a resistance check using an ohmmeter. Anticipated readings are: .5 ohms nominal per unit and 3.2 ohms per 100 ft. of lead-in cable
4. Backfilling and Saw Cut Sealing
Fine, dry sand, such as sandblasting sand, works well for filling the hole in which the Mini-Loop unit is installed. If PVC pipe sleeves were used, fill any excess area around the sleeve also. It will probably work best to fill the tube first. Pour some sand over the unit. Then slowly lift the unit until the depth marking tape aligns with the bottom of the saw cut. Release the unit. If it goes back down, add more sand and repeat. After stabilizing the Mini-Loop unit depth, fully fill the hole to the bottom of the saw cut, also filling around the PVC tube sleeve if used. Complete the installation by filling the saw cut and hole tops with a quality detector loop sealant.
5. Splice lead-in cable if needed Connections from the “Mini-Loop” lead-in to the home-run cable are made using an #18 AWG shielded cable with a tough, high-density polyethylene jacket. This protects the cable and system from factors that might degrade and impede system performance. This cable uses twisted wires (not twisted pairs) to reject magnetic field induced noise.
6. Connection to DML-9LP Detector Unit
The connector is a removable 7-pin terminal block. Pin assignments are shown below – from left to right:
1 – Relay (NC) (opens for detect) 2 – Relay Common 3 – Relay (NO) (closes for detect) 4 – Power Common 5 – Power in (10 to 30 Volts AC or +DC) 6 – Mini-Loop 7 – Mini-Loop
The Detector and Mini-Loop combinations small size and lack of any switches or dials, becomes the industry's first solar friendly “Plug-and-Play” Mini-Loop.